Tuesday 19 November 2013

Cream Buns.

So we arrive at the second sweet treat on my baking to-do list: Cream Buns.

I absolutely loved these when I was younger, and not much has changed! The bun, the cream and the raspberry jam are the perfect combination, and I was dying to try them out!

Once again, after looking on the internet, I couldn't decide on one recipe that I liked. So, I used bits and pieces of each recipe, to arrive at the perfect solution!

Cream Buns

Bun

© 4 cups of plain flour     
© 60 g butter   
© 1/4 cup sugar
© 1/2 cup warm water
© 1 cup warm milk
© 2 tsp dried yeast

© 3 tbl water (extra)

© 1 tbl sugar (extra)


1) Mix dry ingredients together (sugar, yeast and flour).


2) Rub in butter to dry ingredients (This should look like breadcrumbs. It is the same method you use when making scones).
3) Combine warm milk and warm water together.
4) Add in milk/water mixture.
5) Stir until semi-combined.
6) Knead mixture for around 5 minutes until your dough is well-formed.


7) Cover with gladwrap, and set aside in a warm place (I put mine in front of the oven) and leave to rise for around an hour. During this time, preheat your oven to 180°C (this temperature is for a fan-forced oven).
8) After your dough has risen and has roughly doubled in size, give it another knead.
9) Portion your dough into around 12 balls. Set aside and leave to rise for another 15 or so minutes.
10) Put buns into the oven for about 20-25 minutes. During this time, mix together the extra water and sugar.
11) As soon as the buns come out of the oven, brush the water/sugar mixture onto their tops. This gives them a nice, sugary glaze.


TPB TIP: By putting the glaze on after the buns have come out of the oven, this prevents them from burning!

TPB TIP: If the buns are turning too brown whilst in the oven, place a piece of baking paper on top of them.


Cream filling

Many cream buns use mock cream as their filling, and I reallllly wanted to give this a try. And much to my surprise, it actually worked out!

© 4 tbl butter   
© 4 tbl sugar  
© 4 tbl boiling water
© 4 tbl milk

© 1/2 tsp vanilla essence

1) Using a stand mixer, cream butter and sugar for 5 minutes. Your mixture should be very light and creamy.
2) With the mixer running, alternate between adding in the milk and the boiling water. During this time, add in the vanilla essence.
3) Keep mixing until thick.


TPB TIP: Whilst the mixture might seem a bit runny at first, persevere and keep it mixing. It will become thick! Also, put your mock cream in the fridge before piping to make it easier to manage.


Assembly
1) Once the buns are completely cool, slice down the middle.
2) Pipe the cream into the bun, and then top with some raspberry jam.


3) Dust with icing sugar if you are planning on serving them straight away.


And there you go! Your own cream buns!


Until next time, happy baking.

xx


Wednesday 6 November 2013

Wagon Wheels.

So today I cross off my first bakeable treat on my to-do list...Wagon Wheels!
I love wagon wheels. They were a favourite childhood treat of mine, and although I haven't had one in many years, I still find them as delicious as ever!
 
I'm not sure what gave me the desire to make these from scratch, but after receiving encouragement from one of my lovely Instagram followers, I decided to give them a go!

After researching a variety of recipes on the internet, I still hadn't found one that stood out to me. Either the biscuit had multiple types of flours in it (I only have plain and self-raising flour at home) or some used pre-made marshmallow, such as marshmallow fluff (an American spread). So rather than following one recipe, I decided to combine different pieces of each one. So, here you go!
 
 
Wagon Wheels

Ingredients

Biscuit (Adapted from Donna Hay's Black and White Wagon Wheels)

 
© 170g unsalted butter, softened        
© 1 cup (160g) icing (confectioner's) sugar, sifted       
© 1 teaspoon vanilla extract
© 2 teaspoons honey
© 1 egg
© 2¼ cups (335g) plain flour
© 1 tsp baking powder

©A jar of jam (whatever flavour you wish to use..also, you won't be needing the whole jar!)

1) Preheat oven to 165°C (this temperature is for a fan-forced oven).
2) Cream butter and sugar in bowl for 5 minutes. Add in egg, honey and vanilla essence. Beat.


3) Add in flour and baking powder, and mix until combined.
4) Mix dough into a ball. Wrap in glad wrap and flatten out to a disc. Put in fridge for an hour to chill.
5) Once the dough has been in the fridge for an hour, roll between 2 sheets of baking paper until it is half a centimetre thick.
6) Using a round cookie cutter, cut out circle of dough and place on a baking tray lined with paper.


7) Place biscuits in the oven and cook for around 7 minutes (The time they take will depend on whether you are using a fan-forced oven or not).
8) Take out of oven and cool on a wire rack.


9) Pair up your biscuits so that you have two biscuits around the same size.
10) Spread one side with jam, and leave the other blank.

TPB TIP: All of my recipe's temperatures are based on a fan-forced oven. If you don't have a fan-forced oven, just add about 10-12°C onto the temperature I give you!
 
Marshmallow

© 1 cup castor sugar
© 2/3 cup water
© 1 tbl gelatine powder
© 1 tsp vanilla essence
© 1 tsp food colouring

1) Mix castor sugar, water and gelatine until dissolved. Place in pot over low heat and boil for 10 minutes. Do not stir it during this time!


2) After 10 minutes, take off heat and leave for another 10 minute interval.
3) Once cool, put mixture into a stand mixer and leave on medium speed for...you guessed it...10 minutes!

TPB TIP: You will know when your marshmallow is ready. The mixture will be firm enough to stand up by itself. But be careful, once it's ready, it doesn't take long to set!

Once your marshmallow is ready, and your biscuits are spread with jam, you are ready for assembly! Place your marshmallow in a piping bag with a small nozzle attached. Squirt a dollop of marshmallow on top of your jam. Be careful not to put too much on each, as remember you will be sandwiching another biscuit on top, which may cause the mixture to ooze out the sides. Put these in the freezer for around 10 minutes so that they firm up, ready to be dipped in the chocolate mixture.


Chocolate mixture

I used both white and dark chocolate for my wagon wheels, but you can choose whatever flavour you want.

© 400g dark chocolate
© 2 tbl vegetable oil

1) Melt chocolate in the microwave. Add in oil and mix well.
2) Dip each biscuit in the chocolate mixture, ensuring that the sides are covered well. Place on a tray lined with baking paper.
3) Cool in fridge.


TPB TIP: Don't stress if the dipping process becomes messy. This will always be the case! Just remain level-headed and you will be fine! Also, because the chocolate is very runny, most of the time you will get a little pool surrounding each biscuit. Don't worry, this can always be broken off after it has set.
 
And voilà, a yummy treat which will no doubt impress!


Until next time, happy baking.

xx


Tuesday 5 November 2013

My Holiday To-Do List.

Yay! I am finally on holidays!

After a long year at uni, it is so nice to be able to sit here and write, without having guilt creep into the back of my mind, telling me that I should be studying instead. This means that I will have so much time to bake and experiment with new recipes. This makes me so excited!

As some of you might know, I love being organised. I make lists for everything, and plan out events months in advance. So, of course, I have started to compile a list of yummy, bakeable treats (yes, I know bakeable isn't a word) that I am aiming to make over the summer, and I thought I might share it with you!


© Wagon Wheels

I have never attempted these scrummy biccies, but now that I can make my own marshmallow, I have decided to give them a go!

© Blueberry Galette

I absolutely adore anything blueberry, so after watching a program the other night which was all about galettes (a form of loose pastry with fruit in the centre), I am dying to try them out!


© Toasted Marshmallow Macarons

After reading through Adriano Zumbo's 'Zumbarons', I reallllllly want to try this flavour macaron out (Yes, I am semi-obsessed with marshmallows at the moment). His recipes are pretty complex, but I think I am up for this challenge!


© Tiramisu ice-cream
© Mango sorbet
© Vanilla gelato

For my 21st birthday, I was so lucky to get the Ice Cream bowl attachment for my KitchenAid. This summer, I am really keen to try out a heap of new flavours of ice-cream, gelato and sorbet.


© Raspberry Jam  

During summer, we grow an abundance of raspberries. Normally, we can't use them all up, so they go to waste. However, I would love to make my own jam, so that I can use it in my own sweet treats, rather than supermarket bought jam!

© Cream Buns

I absolutely love love love cream buns. They are just so tasty, and they look super cute too! I have been experimenting with different types of dough lately, so it will be interesting to see which dough suits this recipe best!


So that is it for now! No doubt I will add to this list, particularly with Christmas coming up. I adore Christmas baking, so keep your eyes peeled for a special Christmas baking post (or two!)

Until next time, happy baking.

xx


Saturday 2 November 2013

Turkish Delight Macarons.

Macarons...macaroons...who knows the correct spelling? Not me. But what I do know, is that these little, fancy sweets are deceivingly difficult but completely delectable at the same time!

But I must confess, I do tend to avoid these little treats for several reasons.

1) I am a perfectionist, and the few times I have tried to make them, they haven't turned out exactly how I wished they would.
2) They take a lot of time and precision.
3) Up until now, I hadn't found a decent recipe which worked for me!

However, after buying the lovely alice in bakingland book, I was inspired to try them out once more!

Initially, I planned to make a basic rose water shell. Rose water is such a pretty scent and flavour, and I don't get to use it often enough. So when I saw a recipe which suggested using it, I jumped at the chance! However, my normal filling for macarons is generally a white chocolate ganache. But after looking in the cupboard, and realising that we didn't have any white chocolate, I had to change my plans. It's so important to get the filling right, as it is this which binds the two flavours together. Rose water doesn't go with a lot of flavours, making this task a bit harder than usual. However, I soon realised that Turkish Delight is made up of rose water and milk chocolate, hence my Turkish Delight Macarons!


Turkish Delight Macarons

Ingredients

Rose water shell

© 60 g almond meal
© 100g icing sugar

© 50g egg whites
© 17g granulated sugar
© 1-2 drops of pink food colouring (depending how dark you want your macarons to be)
© 1 teaspoon of rose water

1) Put the almond meal and icing sugar in a food processor and grind until a powder forms (This is to ensure that your macarons aren't lumpy...a technique I am yet to perfect).
2) Using a stand mixer, beat egg whites on medium speed until soft peaks form. Slowly add in the granulated sugar until stiff peaks form. During this time, also add in food colouring and rose water.


3) Divide almond mixture into 3 portions. Add in one portion at a time to your egg mixture, folding in slowly and in a gentle manner. It is important that you do not over mix, as this will cause your macaron mixture to become too runny. The consistency of your mixture should be smooth and ribbon like, breaking off when lifted by a spatula.
4) Place mixture into a piping bag.
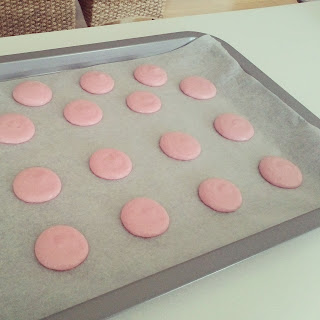
5) On a tray lined with baking paper, pipe on mixture. The macarons should be about the size of a 20c piece. They will spread marginally after piping.
6) Tap your tray onto the bench, as this removes any air bubbles from your macarons.
7) Leave your macarons sitting on the bench top for at least 20 minutes. A skin should form on the top of your shell. This helps with the development of the 'feet' on your macarons. During this time, preheat your oven to 140 degrees Celsius (I use a fan-forced oven).


8) Place macarons in the oven and allow to cook for around 12 minutes.
9) Take out of the oven and allow to cool completely. Don't rush this process, as your macarons will stick to your baking paper if they are not completely cold.

TPB TIP: When piping your macarons, if you get a little peak on top of each shell, wet your finger slightly and gently rub the peak till it is flat.  


Milk Chocolate Ganache

© 125 g milk chocolate
© 1/3 cup cream

1) Melt the chocolate in the microwave (I am so slack and refuse to stand by my stove just to melt chocolate. But this way works perfectly, and I am yet to fail at ganache!)
2) Quickly whisk in the cream and set aside until the mixture begins to firm. 
3) Pipe filling onto macaron shell and sandwich with another.
4) Drizzle any additional chocolate on top of your macarons to make them look extra pretty!


There you go! A delicious recipe for a favourite sweet treat of mine. I dare you to have a go!

Until next time, happy baking.

xx